Overview
Some users may only need eMMA to create a contract and nothing else. This Quick Resource Guide (QRG) is intended for Buyers and Procurement Officers who only need to create a contract in the eMaryland Marketplace Advantage (eMMA) for projects or solicitations awarded outside of the eMMA solicitation process. It shows how to create a contract in eMMA.
NOTE: For best results, use the Google Chrome browser to access eMMA.
If you need help at any time, please reach out to the eMMA helpdesk at emma.helpdesk@maryland.gov.
Step-by-Step Instructions
NOTE: This QRG is only for users who need to create a contract for a solicitation that is not entered in eMMA. If you need to create a contract for a solicitation in eMMA, please see the QRG Create a Contract for an Awarded Solicitation.
NOTE: This QRG uses diagrams with specific callouts to show required and optional fields in forms. A yellow callout with a red border ![]() indicates a required field, while yellow callouts with a black border
indicates a required field, while yellow callouts with a black border ![]() indicate optional fields. Letters within the callouts correspond to the explanations below the diagram.
indicate optional fields. Letters within the callouts correspond to the explanations below the diagram.
NOTE: Additional fields may display depending on your selections.
- Access eMMA at https://emma.maryland.gov and log in with your credentials.
NOTE: Depending on your agency, you may only need to click the State SSO Login (Secure Auth) button or the MDOT SSO Login (MSAzure) button and log in with your credentials. - Click the Contracts tab at the top of the homepage to open the drop-down menu and select the Create Contract option.

- Enter information in the form fields Contract Header section. A red asterisk (*) indicates a required field.

- Contract Title (*): Enter a title for your contract in this field.
- Contract Type (*): Click this field to open the drop-down menu and select an option.
NOTE: There are additional fields that will appear on the Contract Header depending on the Contract Type Selected:Contract Type Additional Contract Header Fields Statewide (without secondary competition) - Procurement Method: Select the means by which the procurement was conducted from the drop-down menu
Statewide Master (with secondary competition) - Procurement Method: Select the means by which the procurement was conducted from the drop-down menu
Individual - Procurement Method: Select the means by which the procurement was conducted from the drop-down menu
- Secondary Non-Competitive Award?: See above
- Is P3?: See above
Secondary Level Agreement - Procurement Method: Select the means by which the procurement was conducted from the drop-down menu.
- Master Agreement: Type the name of the Master Contract that this secondary contract is referencing in the drop-down menu and select it when it appears.
- Sub-Agreement Type: Indicate whether the secondary agreement is a PORFP, RFR, or TORFP agreement.
- Vendor (*): Enter your Vendor’s name in this field. You can also click the See All option and search for your Vendor. See All opens a new window that lists all Vendors. Click the checkbox to the left of the vendor to select it.
- Contract Description (*): Enter a brief description of your contract in this field.
- Procurement Officer/Buyer (*): Click this field to open the drop-down menu and select the See All option. Click the checkbox to the left of the Procurement Officer or buyer you want for this contract.
- Engineer’s Estimate (*): Enter the Engineer’s estimate in U.S. dollars in this field, if applicable.
- Alternate ID: This field is an additional identifier. If you have a Financial Management Information System (FMIS) number, external project number or an internal contract number, enter it here. If not, then skip this field.
- Ownership Interest: Click this field to indicate whether the awarded vendor is owned by the governor or a restricted individual.
- Linked Business Request: If you have a business request linked to this Contract, click this field and select the See All option at the bottom of the drop-down menu. Search for the related business request and click the checkbox to the left of it. Close the window. The selected business request populates this field.
- Linked Sourcing Project: If you have a sourcing project linked to this Contract, click this field and select the See All option at the bottom of the drop-down menu. Search for the related sourcing project and click the checkbox to the left of it. Close the window. The selected sourcing project populates this field.
- Enter information in the fields for the Contract Dates section.

- Effective Date (*): Click this field and select a date for the contract to start. This is the date that the contract officially starts, and performance by the contractor begins.
- Advertise Date (*): Click this field and select a date on which to enter this contract into the public record. This is the date the solicitation was posted/published on eMMA.
- Award Date (*): Click this field and select a date on which you the contract was awarded. This is the date that all approvals of the recommended award are received.
- Fiscal Effective Date (*): Enter the date the funding for your procurement is approved. This date should be the same as the effective date and notes when the funding is available for the contract. This field could auto-populate from the "Effective Date" above.
- Expiration Date (*): Click this field and select the expiration date for this contract. This is the date that the base contract term ends when performance stops without additional actions on the contract.
NOTE: Expired contracts can be cloned; however, they cannot be amended, terminated, and child contracts cannot be created if more than 60 days have passed since the expiration date. - Actual End Date: Click this field and select the date when the contract actually ended. This is the date the contract ends after any renewal options are exercised or extension modifications are approved and should only be filled out when a renewal or extension is completed.
- Fully Executed Date (*): Click this field and select the date when the contract was fully executed. This is the date when the contract is signed by all parties after all required approvals are received (including control agencies or BPW). This is the date that signifies that the contract is ready to be posted on eMMA and should be done within 30 days of this date.
- Enter information in the form fields for the Option & Review Schedule section. A red asterisk (*) indicates a required field.

- Option Type (*): Depending on whether your contract has options, click this field and select either No Options, or Option(s) with Same Terms.
NOTE: If you select Option(s) with Same Terms, optional fields (b) # of Option Periods, and (c) Option Period (months) become mandatory fields. The Total Options Amount field appears in the Negotiated Terms tab and becomes mandatory as well. - # of Option Periods: Enter the number of option periods for this contract.
- Option Period (months): Enter the number of months a contract is extended upon renewal.
- Review Date: Click and select the date to review this contract. It should be before or on the same as the notice date.
- Review Period: Enter the time in months (ahead of the minimum notice period) reserved for reviewing the upcoming renewal or termination for the contract.
- Notification Date: Enter the date that you want the notice sent out. It must be prior or equal to the contract end date or the actual end date.
- Notification Period (months): Enter the minimum number of months’ notice required before termination or auto-renewal (per the contract).
 PRO TIP: Once you set a review and notification date, eMMA will send you a renewal notification before the option needs to be renewed.
IMPORTANT!! If you have added options to this contract, you must add them to the Negotiated Terms page. Click the Negotiated Terms tab, enter the full amount of the options in the Total Remaining Options Amount field and click the Calculate button.
- Option Type (*): Depending on whether your contract has options, click this field and select either No Options, or Option(s) with Same Terms.
- Enter information in the form fields for the Contract Scope section. A red asterisk (*) indicates a required field.
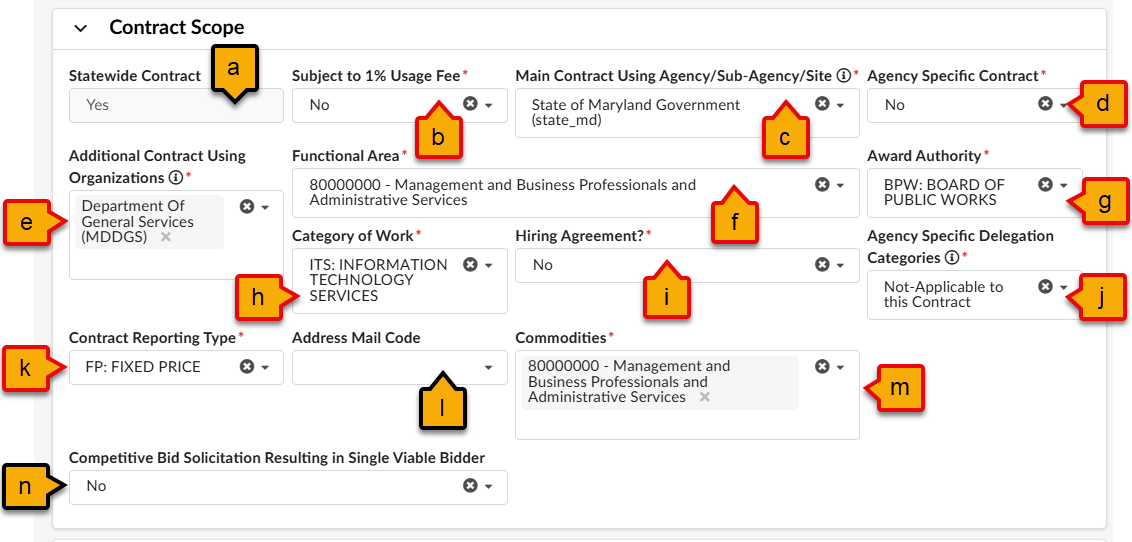
- Statewide Contract: Is this a Statewide Contract? Click this field and select Yes or No from the drop-down menu. (Note that this field will be completed during OSP review on applicable contracts)
IMPORTANT!! If this is a statewide contract, State of Maryland Government (state_md) must be selected in the Main Contract Using Agency/Sub-Agency/Site field and your agency in the Additional Contract Using Organizations field. - Subject to 1% Usage Fee (*): Select yes or no for usage fee. This field will automatically populate to Yes for all DGS controlled contracts. For all other contracts, this field should be set to No.
- Main Contract Using Agency/Sub-Agency/Site (*): This field auto-populates based on your entries above. If agency selection is correct, no action is needed here. If not correct, click the X to the left of the agency name to remove it, then select a different agency name from the drop-down menu that appears.
IMPORTANT! The agency/sub-agency you select for the Main Contract Using Agency/Sub-Agency will be your agency—the agency creating the contract. - Agency Specific Contract (*): Is this an agency-specific contract? Click this field and select Yes or No from the drop-down menu.
- Additional Contract Using Organizations (*): These fields auto-populate from information entered for your sourcing project. Click the fields to adjust them as needed. Otherwise, no action is needed here. If not correct, click the X to the left of the organization to remove it, then select a different organization or commodity name from the drop-down menu that appears.
NOTE: If you had selected Yes in Statewide Contract (b), then enter the State of Maryland Government in the Additional Contract Using Organizations field. If you had selected No in Statewide Contract, then enter the agency you entered in Main Contract Using Agency/Sub-Agency again in the Additional Contract Using Organizations field. - Functional Area (*): This field is only used in Secondary competitions for IT procurement. Enter your main commodity if this applies to your project. (Note that this field is only mandatory when the Contract Type field is set to either Statewide Master (with secondary competition) or Secondary Agreement).
IMPORTANT!! This Functional Area is not the same functional area that the State Procurement Office may be familiar with. This field offers a list of commodities. Click this field and select your main commodity from the drop-down list. - Award Authority (*): Click this field to open the drop-down menu and select the group with the authority to award the contract (typically BPW or Delegated).
- Category of Work (*): Click this field to open the drop-down menu and select the category of work that pertains to this project.
- Hiring Agreement (*): Depending on your selection for Step 6h, this field displays to the right of the Category of Work field. Click this field and select Yes or No from the drop-down menu.
- Agency Specific Delegation Categories (*): Click this field to open a drop-down menu. This captures unique agency categories in addition to the work categories listed.
- Contract Reporting Type (*): Click this field and select your contract type from the drop-down menu.
- Address Mail Code: Select the address mail code from the drop down if applicable.
- Commodities (*): Click the Commodities field to open a drop-down list and click the See All option at the bottom. Select the commodity(ies) from your original sourcing project, if those commodities are not already auto-populated in this field.
- Competitive Bid Solicitation Resulting in Single Viable Bidder: This field relates to whether you received more than one bid for your solicitation. Click this field and select the option Yes or No from the drop-down menu.
- Statewide Contract: Is this a Statewide Contract? Click this field and select Yes or No from the drop-down menu. (Note that this field will be completed during OSP review on applicable contracts)
- Click the Save button at the top of the Header page.

- Click the Additional Information tab from the left-hand side-panel.

- Click the Retainage field in the Retainage section on the right side of the page to open the drop-down menu and select Yes or No from the menu.
NOTE: Additional fields may display depending on the selection you make.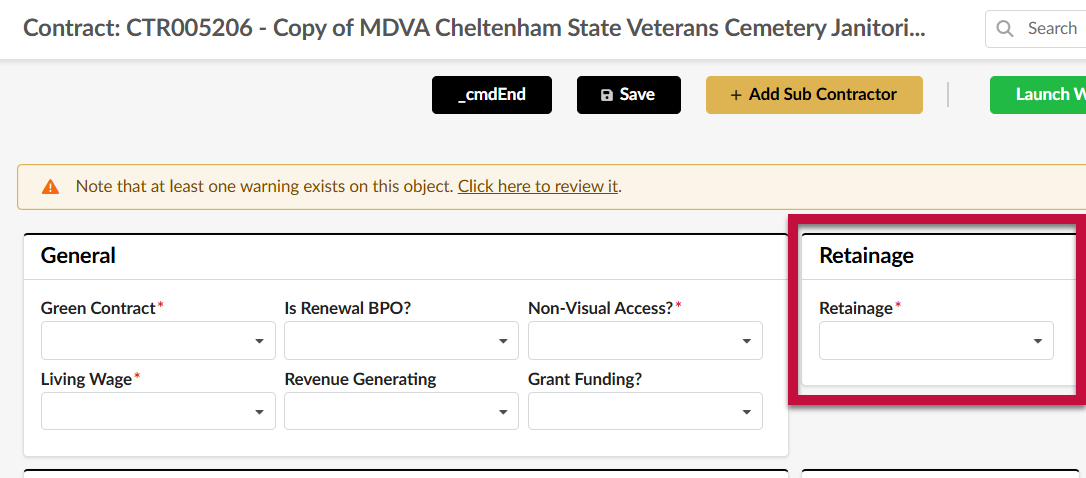
- If you selected Yes in the previous step, follow these instructions. If not, skip to Step 11.

- Click the Retainage Type field to open the drop-down menu and select either F: Fixed Amount or P: Percentage. A new mandatory field opens to the right depending on your selection. Enter the Amount or Percentage required in the field based on your selection. For Retainage Amount (*), enter a dollar amount. For Retainage Percentage (*), enter the percentage amount.
- Click the Escrow (*) field to open the drop-down menu and select Yes or No from the menu. If you select Yes, a new field displays to the right. Click the Escrow Vendor field and search for the Vendor in charge of escrow for your project.
- Enter information in the General section. A red asterisk (*) indicates a required field.

- Green Contract (*): Is this a green contract? Click this field and select the Yes or No option from the drop-down menu that opens. Please refer to this link for more information, https://dgs.maryland.gov/Pages/GreenPurchasing/index.aspx
- Is Renewal BPO?: Is this a renewal contract? Click this field and select Yes or No from the drop-down menu that opens. See the link in Step 8 for more information.
- Non-Visual Access? (*): This is for IT programs that must comply with the requirements for a "non visual" person’s ability to use the system provided. Does the awarded supplier comply with the requirements? Click this field and select Yes or No from the drop-down menu that opens. Please refer to this link for more information https://dsd.maryland.gov/regulations/Pages/21.05.08.05.aspx .
- Living Wage (*): This is the minimum rate allowed to be paid for services in specific geographic areas to ensure the cost of living is met. Click this field and select Yes or No from the drop-down menu that opens. If you select Yes here, a new mandatory field displays. For more information, please refer to COMAR, Title 21 STATE PROCUREMENT REGULATIONS Subtitle 11 SOCIOECONOMIC POLICIES Chapter 10 Living Wage Authority: State Finance and Procurement Article, Title 18, Annotated Code of Maryland.
- Tier Range (*):Click this field and select the appropriate tier from the drop-down menu.
- Tier 1: Anne Arundel County, Baltimore City, Baltimore, Howard, Montgomery, and Prince George’s Counties
- Tier 2: Any county in the State not included in the Tier 1 area.
- Tier Range (*):Click this field and select the appropriate tier from the drop-down menu.
- Revenue Generating: Click this field and select Yes or No from the drop-down menu that opens. Please Refer to COMAR 21.01.03.03 Organizational Applicability: https://dsd.maryland.gov/regulations/Pages/21.01.03.03.aspx
- Grant Funding?: Is there grant funding for this contract? Click this field and select Yes or No from the drop-down menu that opens. If you select Yes, new fields display in the Program Goals section.
- Enter information in the Program Goals section. New fields may display depending on your selections. A red asterisk (*) indicates a required field.

- Federal Funding: Does your project have Federal funding? Click this field and select Yes or No.
- SBR Designation (*): Does your project have a Small Business Reserve (SBR) Designation? Click this field and select Yes or No.
- VSBR Designation(*): Is your project part of the Veteran-owned Small Business Reserve (VBSR) program? Click this field and select Yes or No.
- If you selected Yes, two new fields display:
- The VSBE Goal % (*) field displays. Enter a percentage for your VSBE goal.
- The VSBE Waiver (*) field displays in the Waiver section to the right. Click this field and select Yes or No.
- If you select Yes, 7 new fields display.
 VSBE Waiver Percentage (*)
VSBE Dollar Commitment
VSBE Waiver Request Date (*)
VSBE Waiver Requested Amount
VSBE Waiver Approved Date
VSBE Waiver Approved Amount
- If you select Yes, 7 new fields display.
- If you selected Yes, two new fields display:
- SBE Goal?: Does your project have an Small Business Enterprise (SBE) goal? Click this field and select Yes or No.
- DBE Goal?: Does your project have a Disability Business Enterprise (DBE) goal? Click this field and select Yes or No.
- If you selected Yes, two new fields display:
- DBE Participation (%) (*): Enter a percentage for your DBE participation goal.
- DBE Waiver (*): This field displays in the Waiver section to the right. Click this field and select Yes or No.
- If you select Yes, 6 new fields display in the Waiver section. Enter the appropriate answers in the respective fields as they apply to your project.

DBE Waiver Requested
DBE Waiver Percentage
DBE Dollar Commitment
DBE Waiver Request Date
DBE Waiver Requested Amount
DBE Waiver Approved Date
DBE Waiver Approved Amount
- If you select Yes, 6 new fields display in the Waiver section. Enter the appropriate answers in the respective fields as they apply to your project.
- If you selected Yes, two new fields display:
- MBE Goal: Does your project have a Minority-owned Business Enterprise (MBE) goal? Click this field and select Yes or No.
- If you selected Yes, four new fields display:
- MBE Goal (%) (*): Enter the percentage for your MBE goal in this field.
- MBE Ethnicity: Click this field and select an option from the drop-down menu that opens.
- MBE Sub-Goals: Does your project have MBE sub-goals? Click this field and select Yes or No.
- If you selected Yes, a new field displays.
Minority Subcontractor: Click this field and select the Yes or No option from the drop-down menu.
- If you selected Yes, a new field displays.
- MBE Waiver (*): This field displays in the Waiver section to the right. Click this field and select Yes or No.
- If you select Yes, six new fields display in the Waiver section. Enter the appropriate answers in the respective fields as they apply to your project.

MBE Waiver Percentage (*)
MBE Dollar Commitment
MBE Waiver Request Date (*)
MBE Waiver Requested Amount (*)
MBE Waiver Approved Date
MBE Waiver Approved Amount
- If you select Yes, six new fields display in the Waiver section. Enter the appropriate answers in the respective fields as they apply to your project.
- If you selected Yes, four new fields display:
- Federal Exemption: Does your project have Federal exemption? Click this field and select Yes or No.
- Federal Funding Split: If your project has Federal funding, enter the split (in decimal form) in this field.
- Special Funding Split: If your project has special funding, enter the split (in decimal form) in this field.
- Other Funding Split: If your project has other funding, enter the split (in decimal form) in this field.
- For the fields at the bottom of this section related to funding, please refer to your fund certification to fill these fields in correctly.
NOTE: If either the MBE Goal or VSBE Goal field is set to Yes, the contract will require a subcontractor. Please add a valid subcontractor to the contract by following the instructions in Add a Subcontractor to a Contract and Add an Invoice (PO).
- Click the Negotiated Terms tab on the left-hand side-panel.

- Enter the total dollar amount in the Contract (Not-to-Exceed) Amount (*) field and click the Calculate button.

- Click the Save button at the top of the page.
IMPORTANT: If you skip this step you risk losing your work to this point. - Click the Contacts tab in the left-hand side-panel to display the Internal Contacts section.
NOTE: The PO who creates the contract is the Responsible party by default and is the only team member who can edit Contract information (via an amendment) after the contract is published. The Responsible role can be reassigned after publishing so that another user can manage the contract.- To remove a user contact, click the Trashcan icon to the left of the contact’s name.

- To change the role of an existing internal contact, click the field to the right of a user’s email address, in the Profile(s) column, to open a drop-down menu. Select a profile role for the contact from the drop-down menu.

- To add a new SME or other Buyer contact, click Select user(s) to open the drop-down menu, which displays a partial list of users in eMMA. Click one or more names on the list or click See All at the bottom of the menu to display the Browse Users window.

- To add a Vendor contact, click the Create New Contact button. A pop-up window displays. Enter information for the Vendor Admin contact in the fields provided. A red asterisk (*) indicates a required field.

- To remove a user contact, click the Trashcan icon to the left of the contact’s name.
- Click the Documents tab on the left-hand side-panel.
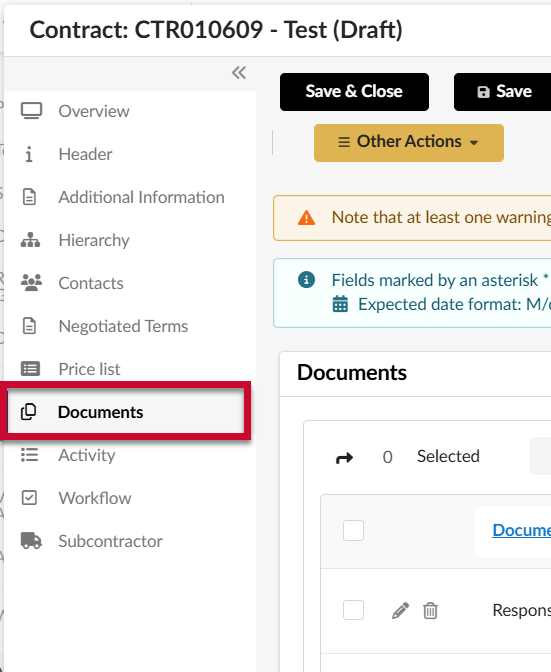
- Click the + Add button. Any attached documents are listed on this page.
NOTE: Uploaded documents may not exceed 300,000 KB.
- From the drop-down menu that opens, select the Certificate of Standing option. The Document pop-up window opens.

- Enter the appropriate information in the respective fields. A red asterisk (*) indicates a required field.

- Document Name (*): Enter a name for the document in this field.
- Acquired Date (*): This date auto-populates with today’s date. Click this field to select a different date.
- Visible to Vendor: You must select this checkbox if you want Vendors to be able to view this document. (Note that this field may appear collapsed under the Document Details header)
- Summary: Enter a brief summary of the document in this field. (Note that this field may appear collapsed under the Document Details header)
- Waive Certificate of Standing Requirement: Select this checkbox to waive the certificate of standing requirement.
- If you select this checkbox, the Reason for Waiver Request (*) field displays. Enter the reason for waiving this requirement.
- Click or Drag to add files(*) button: Click this button to browse your device for a file or drag a file to this button to add it.
NOTE: Uploaded files cannot exceed 307,200 KB.
NOTE: You cannot directly edit documents in eMMA, but you can upload new versions.
- Click the Save & Close button in the Document pop-up window. The document displays on the Documents page.
- Click the In Good Standing button to the right of the Certificate of Standing document you added.

- Click the + Add button to open the drop-down menu and select the Tax Clearance option.
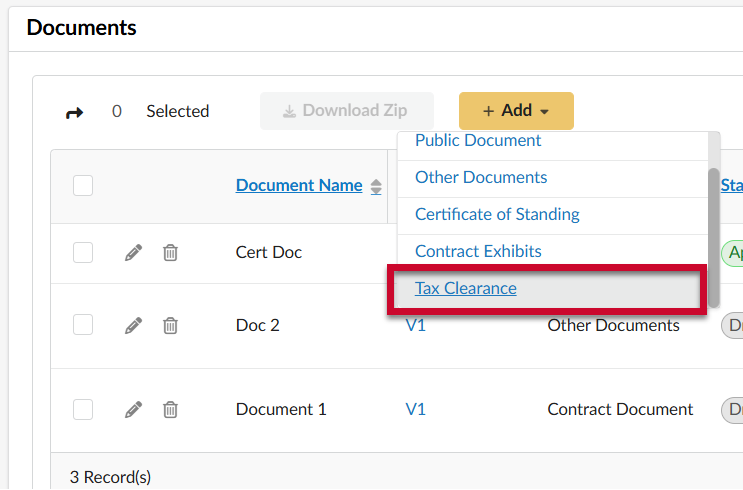
- Enter the appropriate information in the respective fields. A red asterisk (*) indicates a required field.

- Document Name (*): Enter a name for the document in this field.
- Acquired Date (*): This date auto-populates with today’s date. Click this field to select a different date.
- Visible to Vendor: You must select this checkbox if you want Vendors to be able to view this document. (Note that this field may appear collapsed under the Document Details header)
- Summary: Enter a brief summary of the document in this field. (Note that this field may appear collapsed under the Document Details header)
- Waive Tax Clearance Requirement: Select this checkbox to waive the certificate of standing requirement.
- If you select this checkbox, the Reason for Waiver Request (*) field displays. Enter the reason for waiving this requirement.
- Click or Drag to add files(*) button: Click this button to browse your device for a file or drag a file to this button to add it.
NOTE: Uploaded files cannot exceed 307,200 KB.
NOTE: You cannot directly edit documents in eMMA, but you can upload new versions.
- Click the Save & Close button in the Document pop-up window. The document displays on the Documents page.
- Click the In Good Standing button to the right of the Tax Clearance document you added.

- Click the Save button at the top of the Documents page.
IMPORTANT!! DGS contracts will also automatically contain the {DGS Mandatory Document} 1% Administration Fee as an included attachment. DGS users must click Finalize by PO next to this document, then click Save before proceeding to the next step.
- Click the + Add button to open the drop-down menu and select the Contract Document option.

- Enter the appropriate information in the respective fields. A red asterisk (*) indicates a required field.

- Document Name (*): Enter a name for the document in this field.
- Visible to Vendor: You must select this checkbox if you want Vendors to be able to view this document. (Note that this field may appear collapsed under the Document Details header)
- Summary: Enter a brief summary of the document in this field. (Note that this field may appear collapsed under the Document Details header)
- Click or Drag to add files (*) button: Click this button to browse your device for a file or drag a file to this button to add it.
NOTE: Uploaded files cannot exceed 307,200 KB.
NOTE: You cannot directly edit documents in eMMA, but you can upload new versions.
- Click the Save & Close button in the Document pop-up window. The Contracts Document displays on the Documents page. You will see two buttons to the right of the document; Create New Version, and Finalize by PO.
IMPORTANT!! DO NOT click the Finalize by PO button until you have all signatures you need and no more changes to make to the Contract Document.
 PRO TIP: If you had indicated that your project has an MBE, VSBR, or other program goal, you may see a blocking error message such as “No Subcontractor was added for the following goal(s): MBE,” and you will need to add one or more subcontractors for that goal. Click the +Add Sub Contractor button.
Follow the linked instructions below from Step 4, before moving to the next step in the instructions in Add a Subcontractor to a Contract.
- (Optional) Click the Price list tab on the left-hand side-panel.
- If you have price list items, review them for accuracy.
- Click the Edit (pencil) icon to change information regarding the price line items, if necessary.

- Click the Edit (pencil) icon to change information regarding the price line items, if necessary.
- If you don’t have price list items on this page:
- Click Save.
- Add the items using Steps 12-19 of the Adding Line Items QRG.
- If you have price list items, review them for accuracy.
- Click the Workflow tab on the left-hand side-panel and click the Launch Workflow button at the top of the Workflow page.
IMPORTANT!! If you see the following alert, please contact the Helpdesk for assistance updating the Vendor's status prior to submitting the contract through the workflow. Vendor: XXX has status "Registered". Please make sure that this vendor has an Active status on the Vendor Record in Vendor module.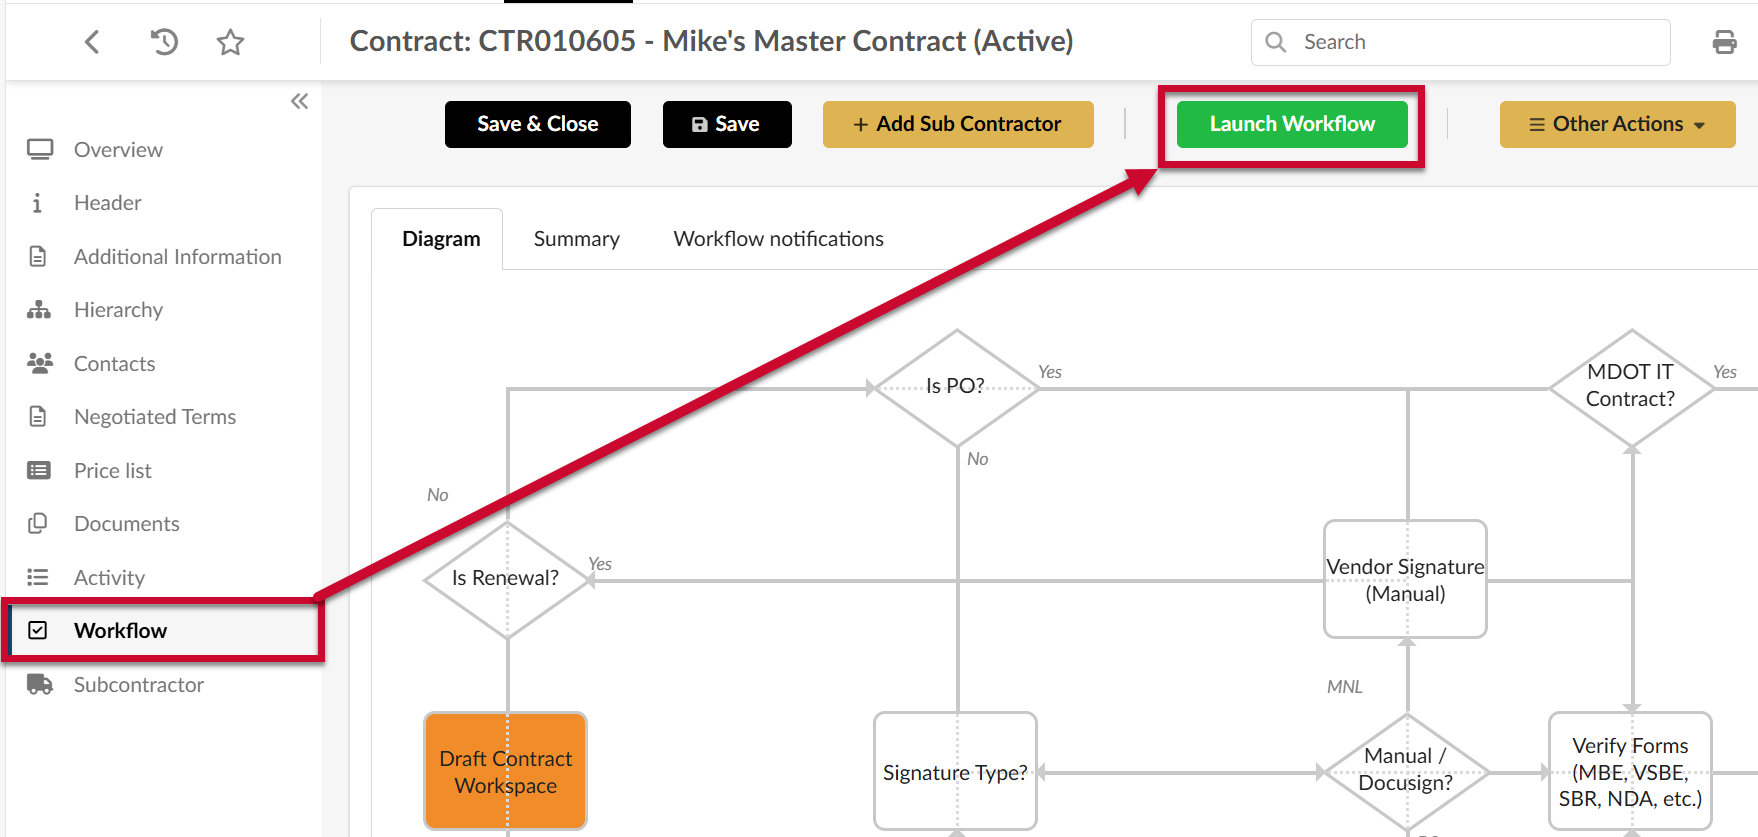
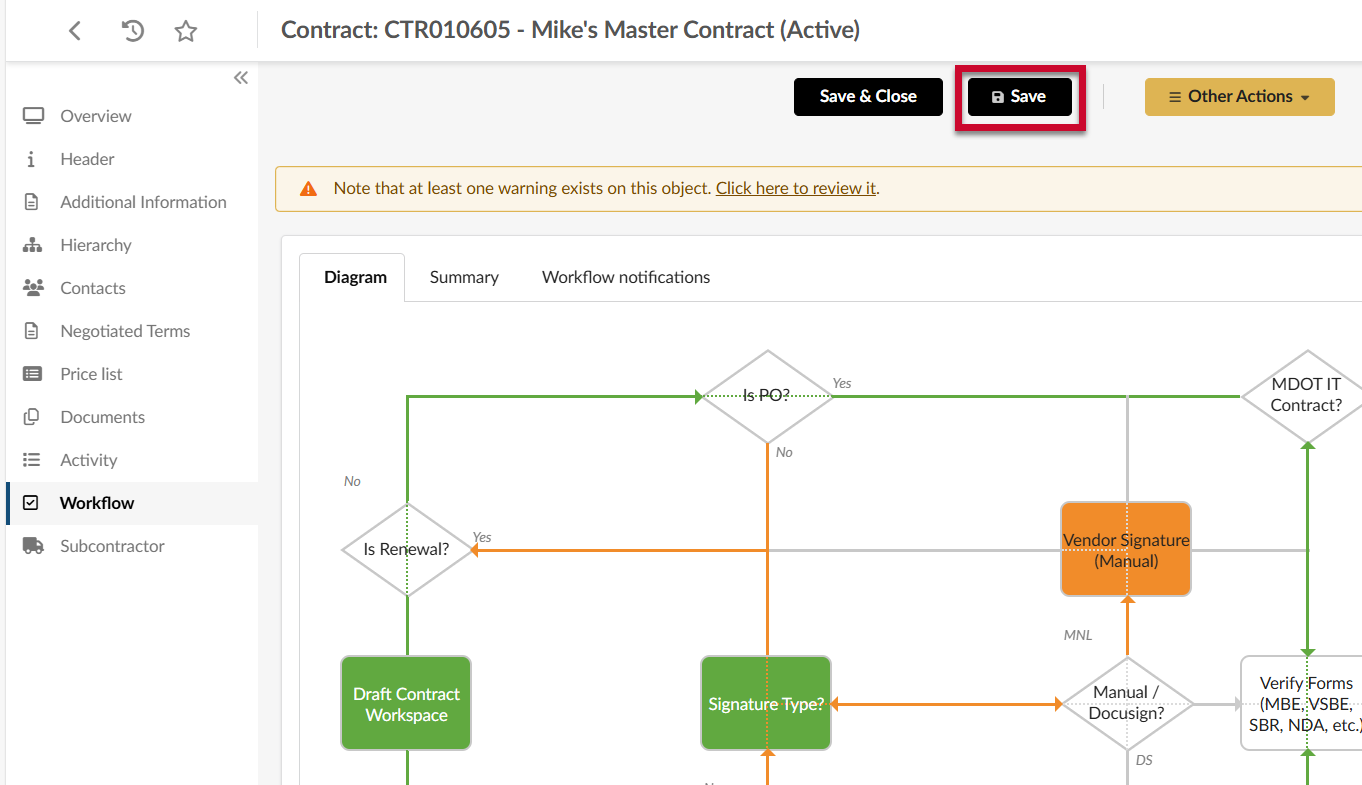
NOTE: If at any point you see the workflow stopped at a point labeled Signature Type?, then the system needs to know how you want your contracts signed. - IMPORTANT: These instructions explain the manual signing process. The word “manual” here refers to the process of obtaining a signature in ink and paper and/or otherwise outside the system. If you wish to use DocuSign, please check with your agency and see the QRG Using DocuSign in eMMA for DocuSign instructions.
Click the green Manual button at the top of the Workflow page to obtain a signature manually. The Signature Type point turns green after you click it.
- Click Save at the top of the Workflow page. The Buyer must now separately seek required signatures on all documents. Vendors do not have the ability to upload or manipulate the Documents tab.
- Once the Vendor has signed and returned all required document(s) to the PO, the Buyer must click the Vendor Execute button at the top of the screen to move the workflow process forward.
NOTE: The Procurement Officer is responsible for moving the workflow through the process after each required signature is complete and at various points where required. They are also responsible for uploading the final Contract Document in eMMA. The Procurement Officer should be making Agency Specific Task Approvals and Form Verifications between each approval from the signatories. - Follow the workflow and make sure to complete the responsive responsibility checks for the vendor.
- Once final signed copies of all contract document(s) are received, and all workflow approvals obtained, Buyers should ensure final versions are uploaded and finalized on the Documents tab. Click the Edit (pencil) icon to the left of the document to upload newest versions.

- The Procurement Officer clicks the Documents tab in the left-hand side-panel, and clicks the Finalize by PO button for the Contract Document.
IMPORTANT: Only click the Finalize by PO button if the document needs no further changes or signatures.
- The Procurement Officer clicks the Workflow tab in the left-hand side panel and clicks the Publish button.

Workflow Page Features
Summary Tab
Within the Workflow tab, there are two additional sub-tabs. The Summary sub-tab within the workflow tab can be very useful for viewing approval steps (approved, rejected, pending) and activity on the contract record.
This section shows:
- Activity: The applicable workflow step.
- Effective Performer: The user who completed the activity in the workflow
- Initialization Date: When the task was initiated.
- Effective Date: When the task was completed.
- Duration: How long the workflow was at the step.
- State: The state of the completed task.
Click the chevron (arrow) ![]() to the left of an Activity on the Summary tab to view additional details.
to the left of an Activity on the Summary tab to view additional details.
The system generates email notifications that go out as the workflow moves through the approval process. These let you and others know what the next step is. You can view this at any time in the Contract process.
Workflow Notifications
The Workflow Notifications sub-tab displays a list of all email notifications sent by eMMA as the contract proceeded through the workflow. This section shows each sent email from the eMMA system as well as who sent it to and when. Click the hyperlink in the Subject column to open a new window and see the email content.