Overview
Many Vendors have more than one valid order or payment address. The State of Maryland calls an additional payment order or payment address a “mail code.” The eMaryland Marketplace Advantage (eMMA) calls it a “Remit-To address.” This quick reference guide (QRG) shows a user in the Accounting role how to create a request to add a remit-to address for a Vendor.
IMPORTANT!! Creating a new Remit-To Address is considered a Change Request. You can only submit one Change Request for a Vendor at a time. If you have another change to make to the same vendor (i.e. – a name change), you will need to repeat this process after the first change has been fully processed. That change will also follow the same approval path as the previous Remit-To Change Request.
NOTE: For best results, use the Google Chrome browser to access eMMA.
If you need help at any time, please reach out to the eMMA helpdesk at emma.helpdesk@maryland.gov.
Prerequisites
You will need a current invoice to upload into eMMA.
IMPORTANT: Providing a document is for evidence purposes only. Do not submit an invoice here for payment processing.
Step-by-Step Instructions
IMPORTANT!! You can only add a Remit-To address to an Active Vendor in eMMA and non-interfacing Vendors.
NOTE: Based on your role in eMMA, what you see on your screen may vary with what is shown in these instructions.
NOTE: This guide uses diagrams with specific callouts to show required and optional fields in forms. A yellow callout with a red border ![]() indicates a required field, while yellow callouts with a black border
indicates a required field, while yellow callouts with a black border ![]() indicate optional fields. Letters within the callouts correspond to the explanations below the diagram. A red asterisk (*) indicates a required field in the eMMA interface.
indicate optional fields. Letters within the callouts correspond to the explanations below the diagram. A red asterisk (*) indicates a required field in the eMMA interface.
- Access eMMA at https://emma.maryland.gov and log in with your credentials.
NOTE: Depending on your agency, you may need to click the State SSO Login (Secure Auth) button or the MDOT SSO Login (MSAzure) button and log in with your credentials. - Click the Vendors tab at the top of the webpage and click the Browse Vendors option from the drop-down menu.

- Use the Search fields at the top of the page to locate the Vendor. You can enter the Vendor’s Code, Company Name, Legal Name, etc. in the keywords field. Then click the Search button in the top right.

- Click the edit (pencil) icon on the left side of the Vendor to access the Vendor profile.

- Click the Create Payment Address button at the top of the webpage.

- Click the Initiate Setup Process button at the top of the webpage.

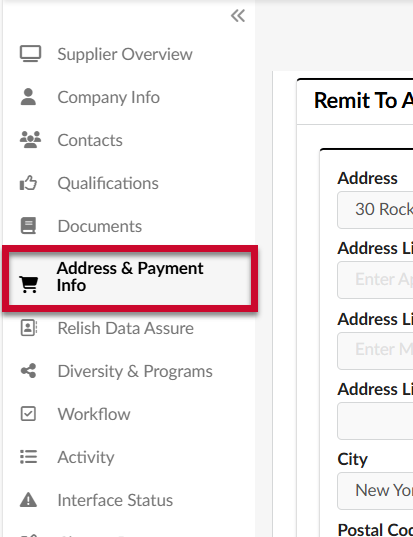
- Click the Address & Payment Info tab on the left-hand side panel.
- Enter information in the fields for the Remit To Address section. A red asterisk (*) indicates a required field.
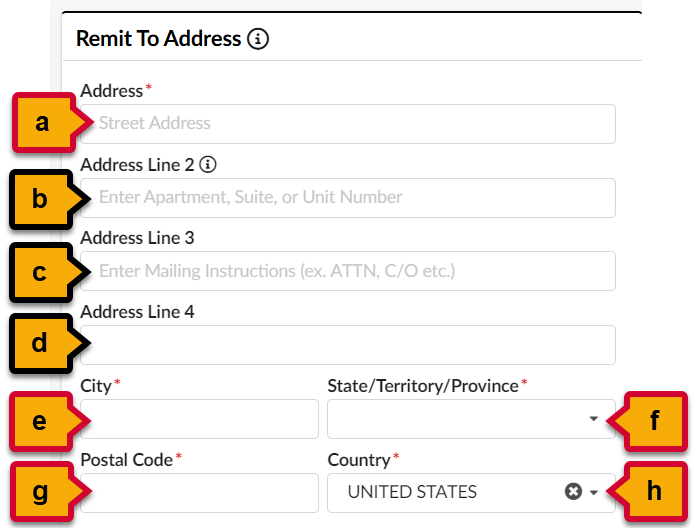
- Address (*): Enter the Remit-To street address in this field.
- Address Line 2: Enter a second line for the Remit-To street address if necessary.
- Address Line 3: Enter additional mailing instructions in this field. EXAMPLE: ATTN, C/O, etc.
- Address Line 4: Enter any internal notes from R*Stars here. This field is NOT visible to the Vendor.
- City (*): Enter the city for the Remit-To address.
- State/Territory/Province (*): Enter the state, territory, or province for the Remit-To address.
NOTE: If you choose Maryland as the state, a new required County field displays below the Postal Code field. Click this field to open the drop-down menu and select the county where the Remit-To address is located.
- Postal Code (*): Enter the postal zip code for the Remit-To address.
- Country (*): Enter the country for the Remit-To address.
- (Optional) Enter contact information regarding the Remit-To address in the Remit-To Address Contact Information section.

- AP Invoice Email: Enter the email address for the payment department for the Remit-To address.
- AP Invoice Phone: Enter the phone number for the payment department for the Remit-To address. The format is a 10-digit number without spaces or hyphens.
- AP Invoice Fax: Enter the fax number for the payment department for the Remit-To address. The format is a 10-digit number without spaces or hyphens.
- Ensure all information is accurate and click the Save button at the top of the window.

- Click the Required Document: Invoice alert in the right-hand side-panel, or click the Documents tab on the left-hand side-panel.
IMPORTANT: Providing a document is for evidence purposes only. Do not submit an invoice here for payment processing.
- Scroll down to the Attestations & General Documents section and click the Add (plus) icon to the left of the Invoice in the Type column. The Edit document window displays with invoice specifications to the right of the Document Details.

- Click the Click or Drag to add a file button to choose a file from your device or drag and drop the file on this spot to add it. The added file displays below this button. Click the X to the left of the document to remove it.
NOTE: You cannot upload documents over 307,200 KB in size.
NOTE: You cannot directly edit documents in eMMA, but you can upload new versions.
- Click the Date Provided field and select the date your agency received the invoice.

- (Optional) Add comments in the Comments field below the Document Details regarding the uploaded document. You may need to scroll down in the window to see this field.

- Click the Save button at the top of the window.

- Click the Submit Document button at the top of the Edit document window.

- Click the X in the upper right-hand corner of the Edit document window to close it. The uploaded document shows as attached on the Documents page.

- Click the Agency Selection Required alert on the right-hand side-panel, or click the Qualifications tab on the left-hand side panel.
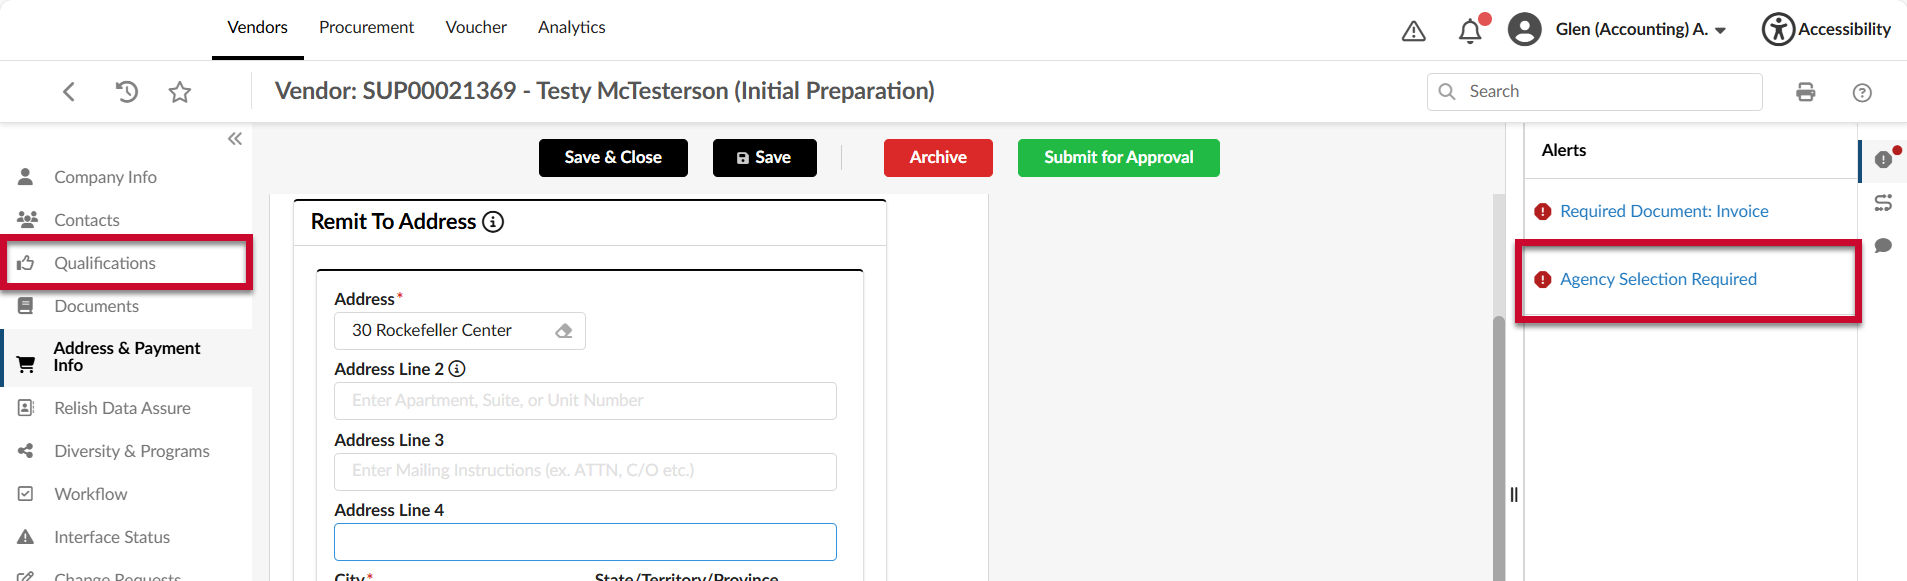
- Click the + Add an Agency button.

- Click the blank field below the Agency column to open the drop-down menu and select an agency. If you don’t see your agency listed, click the See All option at the bottom of the menu.

Clicking See All opens a window that lets you browse for state agencies in eMMA. Click the plus icons to the left of the organization to see agencies within that organization. You can also search for your desired agency in the Keywords field.
Select the checkbox to the left of the Vendor’s appropriate agency. The window closes and the agency populates in the field.
- Click the Save button at the top of the webpage.

- Click the blank field under the Pending Status column and select the Approved option from the drop-down menu that opens.

- Click the Save button at the top of the webpage and click OK in the prompt that displays.

- (Optional) Repeat Steps 21-15 to add any additional agencies to this Vendor.
- Click the Submit for Approval button at the top of the webpage.

The request will be sent to and reviewed by the appropriate authorized users.
IMPORTANT!! You can only submit one Change Request for a Vendor at a time. If you have more than one Remit-To address to add, you will need to repeat this process for the next address. That address will also follow the same approval path as the previous Remit-To Change Request.