Overview
This Quick Reference Guide (QRG) shows you how to complete your Vendor onboarding in the eMaryland Marketplace Advantage (eMMA). This usually occurs so that your business can work with the State of Maryland. Depending on how your profile was created, you may or may not need to complete all sections listed here. Please review each section carefully.
- Complete Company Info
- Add Tax Documents
- Add an Additional Vendor Admin Contact (Optional)
- Submit Your Vendor Profile
Prerequisites:
You will need to have completed your Vendor Registration. You may receive an email notification requesting additional information after an internal review of your completed vendor profile.
You will need:
- A current W-9 IRS form, if applicable
- If you are out of state or foreign, a current W-8 IRS form
- If your Tax ID is SSN, a photo ID image to upload
NOTE: (Optional) You may select the Decline Onboarding button if you do not wish to proceed with your vendor profile completion. If selected, a notification email is sent to the Procurement Officer or personnel who created your profile.
NOTE: For best results, use the Google Chrome browser to access eMMA.
If you need help at any time, please reach out to the eMMA helpdesk at emma.helpdesk@maryland.gov.
Step-by-Step Instructions
Updating Your Vendor Profile
NOTE: This QRG uses diagrams with specific callouts to show required and optional fields in forms. A yellow callout with a red border ![]() indicates a required field, while yellow callouts with a black border
indicates a required field, while yellow callouts with a black border ![]() indicate optional fields. Letters within the callouts respond to the explanations below the diagram. A red asterisk * indicates a required field.
indicate optional fields. Letters within the callouts respond to the explanations below the diagram. A red asterisk * indicates a required field.
Complete Company Info
Access eMMA at www.emma.maryland.gov and log in with your credentials.
If this is your first time logging in, you will be asked to create a password. Open the email notification you received requesting you to log in to the vendor portal. If you do not see this email in your Inbox, please check your Spam and Junk folders.Click the login link in the email you received to access eMMA at emma.maryland.gov and login with your credentials.
 PRO TIP: Click the Lost your password? link to reset your password, if needed.
- Click Edit (pencil) icon to the left of the Vendor Setup in the My To-Do List section. Your Company Info page displays.

- Review the data in the Company Information section and the Main Address section for accuracy and make changes if necessary.
 PRO TIP: Write down the number in the eMMA Vendor ID field and keep it somewhere safe. This is your Vendor Profile number. You may need to provide it to someone at the helpdesk, or at the state.
- Enter relevant information in the fields for the Corporate Contact Information section if you have not already completed this portion.
NOTE: You may need to scroll horizontally to see this section.
- Corporate email: Enter the general email address for your company.
- Corporate Phone (*): Enter the general phone number for your company without spaces or dashes.
- Corporate Fax: Enter the general phone number for your fax, if applicable.
- Complete the fields in the State Programs section under Procurement Programs. Required fields are marked with a red asterisk (*). Use the dropdown menu to indicate if your company is currently enrolled in any of the following programs.

- Diversity & Programs tab:
 PRO TIP: If you already have a Minority Business Enterprise (MBE) certification, the relevant information will populate in the Diversity & Programs tab on the left-hand side-panel.
- Do not check the boxes on this page. They will auto-select if you are certified.
- If you don’t have an MBE certification and want to know more about applying, please visit the MBE Homepage.
- Apply for the CSB Certification? (*): Do you want to apply to become a Certified Small Business (CSB)? Click the field and select the Yes or No option from the dropdown menu.
- Select Yes from the dropdown list to start your CSB certification. This creates a form in the Documents tab on the left-hand side-panel. Click the plus icon to complete the form. You can complete this form at any time. For more information regarding CSB and how to complete this form, please see the QRG CSB Certification and Recertification.
- Select No if you do not want to obtain your Certified Small Business (CSB) certification at this time. You will still have the option to complete the certification process later.
NOTE: Vendors must complete Certified Small Business (CSB) certification process via eMMA to participate in the State of Maryland's Small Business Reserve (SBR) and Small Business Preference (SBP) programs.
- Apply for the VSBE Program?*: Do you want to apply for the Veteran-Owned Small Business Enterprise program (VSBE)? Click the field and select the Yes or Nooption from the dropdown menu.
- Select Yes to initiate the VSBE certification process with the State of Maryland. This creates a form in the Documents tab on the left-hand side-panel. Click the plus icon to complete the form. For more information regarding VSBE and how to complete this form, please see the QRG VSBE Certification and Recertification.
- Select the No option if you do not want to obtain your VSBE certification now. You can still apply for the VSBE Certification later if you choose.
NOTE: To participate in the VSBE program, Vendors must complete the State of Maryland certification process via eMMA.
- Diversity & Programs tab:
Add Tax Documents
This process starts from your Vendor Profile. Click the General Info tab at the top and the Company Profile option from the drop-down menu.
- Click the Documents tab on the left-hand side-panel.
- Click the plus icon to the left of the required tax document you need to upload in the Legal Documents section. The Edit document window opens.
NOTE: The type of tax document required depends on your type of tax ID.
- Click the Click or Drag to add a file button to choose a file from your device, or drag and drop the file on this spot to add it. The added file displays below this button. Click the X to the left of the document to remove it, if necessary.
NOTE: You cannot upload documents over 307,200 KB in size.
NOTE: You cannot directly edit documents in eMMA, but you can upload new versions.
- (Optional) Add comments in the Comments field at the bottom of the Edit documents window regarding the uploaded document. You may need to scroll down to see this field.
- Click the Save button at the top of the Edit document window. A new button displays.

- Click the green Submit W-9 for Review button that displays.
NOTE: This button may vary, depending on the type of required documentation.
- Click the Save & Close button at the top of the Edit document window. Your uploaded document is shown in the Legal Documents section.


Add Nonprofit Documentation (OPTIONAL)
This step is required if the checkbox on the Company Info tab is selected indicating you are a non-profit organization.
- Click the Documents tab on the left-hand side-panel.
- Click the plus icon to the left of the required document you need to upload in the Attestations & General Documents section. The Edit document window opens.

- Complete the mandatory fields.

- Click the Click or Drag to add a file button to locate the file and upload to eMMA.
- Enter any comments providing additional details about the document, if needed.
- Click Save & Close.
Add an Additional Vendor Admin Contact (OPTIONAL)
This process is optional. You do not need to perform these steps if you don’t need an additional Vendor Admin. Please proceed to the next section if you don’t need this process.
Each Vendor profile must have at least one Vendor Admin. Users with the Vendor Admin role in eMMA can make changes to the associated Vendor profile and will receive notifications via email for solicitations and any required tasks or activities in eMMA. If you need to add more than one Vendor Admin to your Vendor Profile, you can do so following these instructions.
This process starts from your Vendor Profile. Click the General Info tab at the top and the Company Profile option from the drop-down menu.
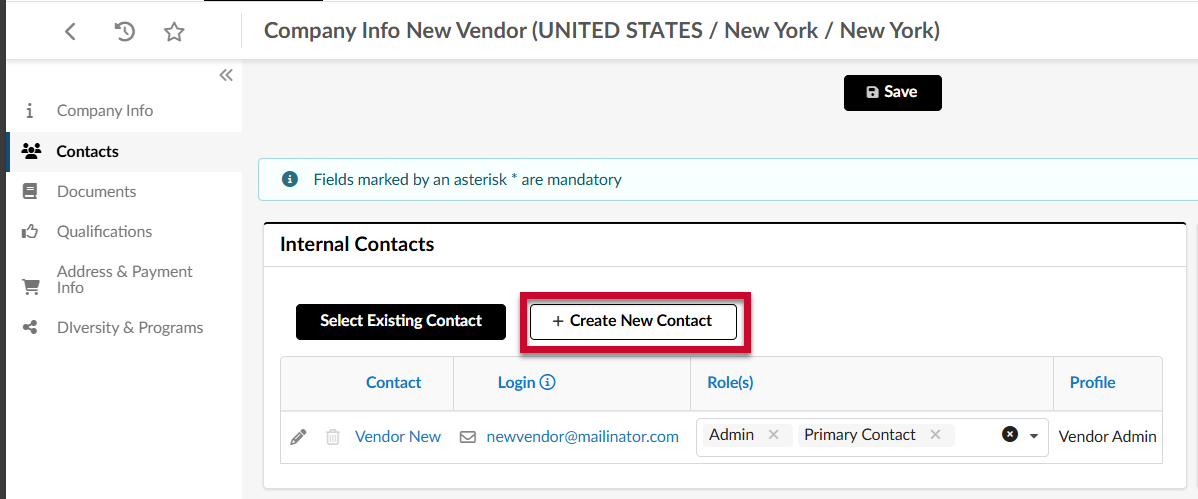
- Click the Contacts tab on the left-hand side-panel to add contacts to your Vendor Profile.
- Click the +Create New Contact button. A pop-up window displays.
- Enter information for the Vendor Admin contact in the fields provided. A red asterisk (*) indicates a required field. The diagram below only shows the fields required to proceed.

- First Name (*): Enter the first name of this Vendor user in this field.
- Last Name (*): Enter the last name of this Vendor user in this field.
- Email (*): Enter the email address for this Vendor user in this field.
- Click the Save & Close button at the top of the window. The window closes and the user is listed under the + Create New Contact button.

- Click the field to the right of the contact, under the Role(s) column, and select both Admin and Primary Contact from the drop-down menu that opens. These selected roles make this user a Vendor Admin.

- Click outside the drop-down list to close it. The selected roles display next to the user.
NOTE: Click the X to the left of the role to remove that role, if necessary. Keep in mind, the Admin and Primary Contact roles are what gives the Vendor Admin those permissions.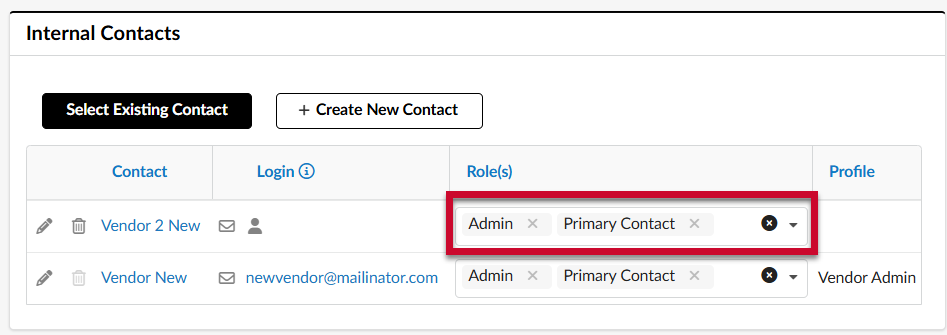
- Click the envelope icon to the right of the contact’s name. The Invitation to log into the application window opens.

- Select the Vendor Admin checkbox on the left-hand side and click the Send Notification button at the top of the window. A message displays confirming that the notification was sent.
 PRO TIP: Scroll down in this window. You can edit the content in the email but do not change the blue links.
- Click the X in the upper left corner of the window to close it. The screen refreshes and the contact now shows as the Vendor Admin on the far right of the entry.

- Click the Save button at the top of the webpage.
Submit Your Vendor Profile
This is the FINAL step you need to complete for onboarding. Please review all changes made to your profile and check for accuracy. Once you perform the final step for the onboarding process, you must submit a change request to make many of the changes in this QRG.
Click the Submit Profile button at the top of the page once all required fields are completed. The page refreshes to your dashboard.
A message bar displays at the top of the screen indicating a successful submission. Authorized personnel at the State will review your profile and notify you via email if more is required.